With new programs being installed, viruses infecting, and spyware lurking in your browsers it is not uncommon for your computer to suddenly stop behaving correctly. In fact, it is almost guaranteed that at some point your computer will just not do what you expect it to. This is not because your a lousy computer user or even a bad person, this is just the life as we know it when working with computers. Luckily for us, Microsoft bundles an application called System Restore into it's operating system to help alleviate this problem. This article will cover what System Restore is, how it works, and how you can use it to protect your computer.
System Restore
System Restore is a feature of Windows XP that allows you to restore
your computer to a previous known working state in the event of a
problem. This is done without loss of personal files or data such as
word processing documents, spreadsheets, music, images, etc. This
feature is enabled by default and runs in the background making backups
after certain events happen on your computer. System restore functions
are only available to an administrator of the computer, therefore if you
are not an administrator, you will not be able to follow this tutorial.
System Restore protects your computer by creating backups of vital
system configurations and files. These backups are known as restore
points. These restore points are created before certain events take
place in order to give you a recourse in case something bad happens
during that event. These events are as follows:
- If you install a new application and that application's installation program is compliant with the System Restore API, which most are these days, then a new restore point will be created.
- Installation of Microsoft security and OS updates will trigger a Restore Point creation.
- If you choose to use system restore to restore to a previous restore point, system restore will create a new restore point prior to restoring a previous state in case something goes wrong.
- Before a Microsoft Backup Utility Recovery operation.
- Before installing an Unsigned driver.
- By manually creating a new restore point.
- By default at a 24 hour interval a new restore point will be made. This restore point will only be made if the system is in an idle state.
- If system restore is disabled and then reenabled a new restore point will be made.
These restore points contain configuration and settings and files that
are necessary for your computer to run correctly. The following are some
of the settings and files that are saved in a Restore Point:
- Registry (Contains Configuration information for application, user, and operating system settings)
- Windows File Protection files in the dllscache folder. (Used for protecting system files)
- COM+ Database
- Windows Management Instrumentation Database
- IIS Metabase (Contains configuration for Internet Information Server)
- Files with extensions listed in the Monitored File Extensions list in the System Restore section of the Platform SDK
- Local Profiles
- Windows XP passwords and hints are not restored. This is done so that you do not by accident restore an old password and then lock yourself out of the computer..
- Microsoft Internet Explorer and Content Advisor passwords and hints are not restored.
- Any file types not monitored by System Restore like personal data files e.g. .doc, .jpg, .txt etc.
- Items listed in both Filesnottobackup and KeysnottoRestore (More on that later)
- User-created data stored in the user profile
- Contents of redirected folders
The amount of space a System Restore will allocate towards its use is,
by default, 12 percent of your total useable space on the particular
partition being monitored if the partition is greater than 4GB,
otherwise it will use up to 400 MB. This amount can be adjusted per
partition in the System Restore tab in your System control panel. If you
have less than 200 MB, system restore will be disabled until the amount
of available space rises above 200 MB. If system restore attempts to
make a new restore point, and that restore point would put you past the
allocated amount of storage that system restore can use, system restore
will delete the oldest restore point automatically to create more room
for the new one.
Disabling System Restore
NOTE: You need to be logged in as an Administrator to administer System Restore. If you are not logged in as an administrator you will not be able to follow these steps
WARNING: By disabling system restore you will delete all stored restore points.
You should first go into the Control Panel and then double click on the System icon. If you are in the control panel and do not see the System icon, click on the link that says "Switch to classic view" in the upper left hand side of the window. Now you should be able to see the System icon. After you double click on it you should then click on the System Restore tab. If system restore is enabled you will see an image like Figure 1 below.
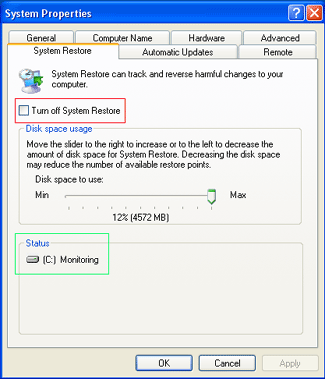
Figure 1: Disabling System Restore
If you see in the Status section, designated by the green box, that it is Turned off , then system restore is already disabled and you do not have to do anything further. If it is showing that it is monitoring as seen in Figure 1 above, then you should check the checkbox labeled "Turn off System Restore", designated by the red box. You should then click on the Apply button to disable system restore.
Enabling System Restore
To enable system restore you should follow these steps.
By default system restore is enabled on Windows XP machines, so there is a good chance that it is already enabled if this is your first time working with system restore.
You should first go into the Control Panel and then double click on the System icon. If you are in the control panel and do not see the System icon, then click on the link that says "Switch to classic view" in the upper left hand side of the window. Now you should be able to see the System icon. After you double click on it you should then click on the System Restore tab. If system restore is turned off you will see an image like Figure 2 below.
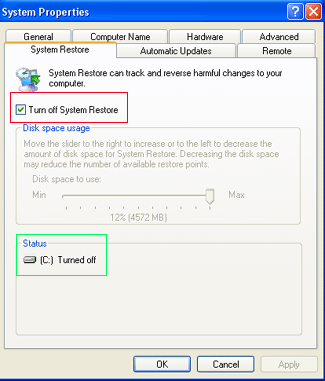
Figure 2. Enabling System Restore
If you see in the Status section, designated by the green box, that it is Monitoring a partition, then system restore is already enabled and you do not have to do anything further. If it is showing that it is turned off as seen in Figure 2 above, then you should uncheck the checkbox labeled "Turn off System Restore", designated by the red box, and then adjust how much disk space you want to allow system restore to use, which is by default 12 percent of your entire disk space.
When you are done with making your settings, you should click on the
apply button. Since you are turning system restore back on, a new
restore point will automatically be made. After the new restore point is
made, you should see in the status section that system restore is
monitoring the partition; which means it is enabled.
Manually Creating Restore Points
It is possible to manually make restore points when you wish by using the System Restore utility. Common reasons to do this are because you feel have your computer set up perfectly and would like to save that state in case something goes wrong in the future.
To open the utility, go to your System Tools group under Accessories in
your Programs menu. Then click on the System Restore icon. You will be
presented with a screen similar to Figure 3 below.
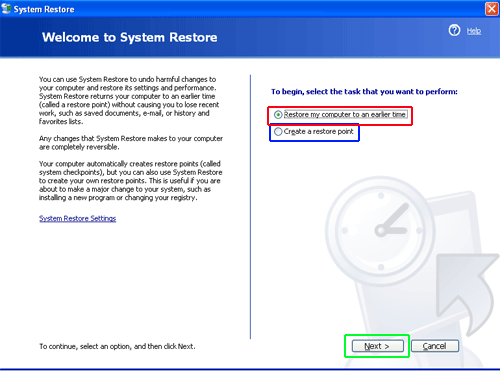
Figure 3. System Restore Utility.
To create a manual restore point select the radio dial labeled "Create a restore point", designated by the blue box, and press the Next button. You will then be presented with a screen similar to Figure 4 below.
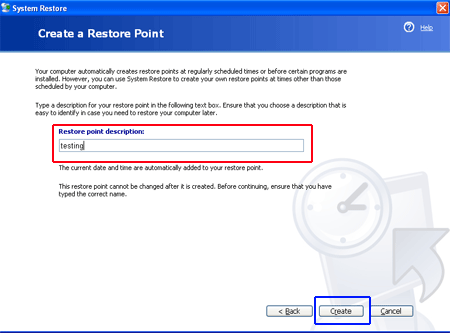
Figure 4. Name your Restore Point
At this point you should type the name you would like this restore point to be referred as in the field designated by the red box. The current date and time will automatically be appended to the name you choose. When you are done, press the Create button designated by the blue box. System restore will create the restore point and give you a confirmation screen with information like Figure 5 below.

Figure 5. Manual Restore Point Created
At this point you can press the Close button to close the System Restore utility.
Restoring Windows XP to a previous State
To restore Windows XP to a previous restore point you need to open the System Restore Utility. To open the utility, go to your System Tools group under Accessories in your Programs menu. Then click on the System Restore icon. You will be presented with a screen similar to Figure 3 above.
You should select the radio button that is labeled "Restore my computer
to an earlier time", which is designated by the red box. When that is
selected press the Next button. You will then be presented with a screen
similar to Figure 6 below.
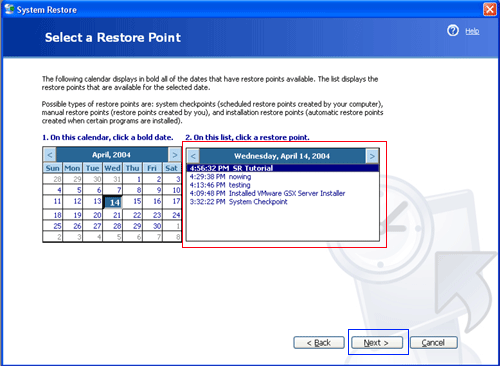
Figure 6. Select a Restore Point
At this point you should select a restore point that you would like to restore. If a particular day has any restore points created on it the date will be in bold. You can then select the restore point by clicking once on its name, as designated by the red box in Figure 6 and then pressing the Next button.
At this point you will prompted with a confirmation as to whether or
not you want to continue. If you do want to continue, you should press
the Next button again, otherwise press cancel. System restore will then
shut down all open applications and reboot the computer.
After the computer is rebooted you will see a screen that contains
information as shown Figure 7 below confirming that the restoration to
the restore point is complete.
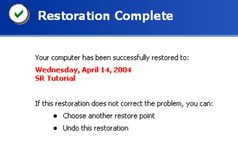
Figure 7. Restoration Complete
If there are any problems with your computer since you restored to this restore point, you can revert back to your previous settings by going back into the System Restore Utility and selecting the "Undo my last restoration" radio button and pressing the Next button as show in Figure 8 below.
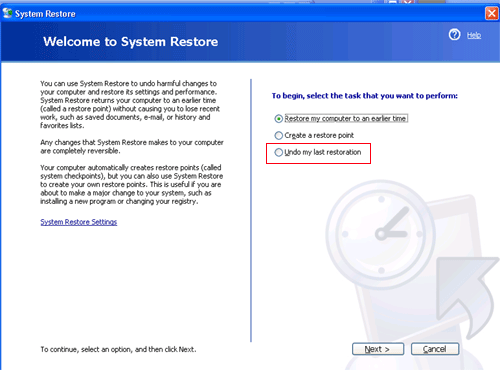
Figure 8. Undo your last Restoration
There are three known safe ways to delete restore points stored on your computer. These ways are described below:
Disk Cleanup - Launch the Disk Cleanup tool and then
select the more options tab. On this tab you will find a section for
System Restore. If you press the Clean Up button for that section,
Windows will delete all restore points except for the most recent one.
Turn off System Restore - Just by turning off System
Restore all your restore points will be deleted. Unless you want this to
happen, be careful that you don't mistakenly delete all your restore
points by disabling system restore.
System Restore runs out of storage space - If system
restore runs out of the storage space that has been allocated towards
its use, it will delete the oldest restore point in order to create
space for the new restore point.
There are some problems associated with System Restore when it comes to
viruses. When restore points are created they are stored in a directory
that is accessible only to the System account and not to a user. This
keeps the restore points safe from misuse and tampering. Unfortunately
this also means that any virus scan software you may have installed can
not scan the files located there as well. This causes a problem if a
file that is infected with a virus gets backed up into a restore point
because now the anti-virus software can not clean it. Now if you ever
restore from a restore point, that file that is infected will be
introduced back into your system.
With this in mind, if you find that you are infected with a virus,
hijacker, or spyware and want to make sure you do not get reinfected if
you restore a restore point, you should turn System Restore off and then
back on again to clear all the restore points. This will guarantee that
their are no infected files that could be restored.
Advanced Info
WARNING: Information found in this section is for advanced
users only. If you use this information without advanced knowledge of
your operating system you can cause serious damage to your Windows
installation.
All restore points are stored in a folder that starts with _restore in the System Volume Information folder found in the root of your individual partitions. This folder is used to store copies of your registry, files, configs, etc. The system volume information folder is only accessible to the System account by default. You can access this folder, though, by adding yourself to the security permissions of this account. Though its advised that you do not do so, I am sure that some of you will poke around in there anyway. Remember, doing this is at your own risk.
Most of the configuration options for System Restore can be found at the following registry key:
HKEY_LOCAL_MACHINE\SOFTWARE\Microsoft\Windows NT\CurrentVersion\SystemRestore
One interesting key you can change here is the interval Windows uses to
make an automatic restore point. By changing the value, which is the
total seconds between automatic restore point creation, you can make
Windows create restore points more often or less frequent. The default
value is 86400, which in seconds corresponds to 24 hours between each
automatic restore point creation.
HKEY_LOCAL_MACHINE\SOFTWARE\Microsoft\Windows NT\CurrentVersion\SystemRestore\RPGlobalInterval
For more information on the registry keys used by System Restore read this Microsoft Knowledgebase article:
You can also specify what registry keys should not be restored and what files should not be backed up by System Restore.
These registry keys are:
HKEY_LOCAL_MACHINE\SYSTEM\CurrentControlSet\Control\BackupRestore\FilesNotToBackup
HKEY_LOCAL_MACHINE\SYSTEM\CurrentControlSet\Control\BackupRestore\KeysNotToRestore
HKEY_LOCAL_MACHINE\SYSTEM\CurrentControlSet\Control\BackupRestore\KeysNotToRestore
The values contained in the FilesNotToBackup key are files or
directories, in which you can specify wildcards as well to exclude all
files in a particular directory. Any files listed in this way will not
be added to a restore point when one is created.
The values contained in the KeysNotToRestore key are registry keys that
should not be restored if you ever restore your computer to a previous
restore point.
The System Restore application is a powerful tool for keeping your Windows Installation running smoothly and safely. If you use this feature you will be guaranteed to have a valid restore point to revert to if any issues arise in the future. Care must be taken, though, when using this application so that damaged or infected files are not restored to your computer and cause you to be reinfected. With caution in mind when using System Restore you should not have these problems. If you are having problems or questions don't hesitate to ask me on my FaceBook page or Email me: c.m.c.firerat@gmail.com
By FireRat

0 comments:
Post a Comment