System Restore is a system recovery feature of Windows that creates
snapshots, or restore points, of the state of your computer at various
intervals or before you perform a certain task. These restore points can
then be used to restore your computer back to the state it was in when
they were taken. When these restore points are created, and restored,
the only files affected are the Windows Registry, programs, and system
files. Your data such as spreadsheets, documents, images, and music
remain untouched between restores.
You may be wondering why you would want to restore your computer to a
previous point. The reason being that there comes a time in every
computer user's life that they install a new program, install a new
driver, or just turn on the computer and find it no longer works as it
did the day before. You have no idea why, can't resolve the problems,
and are left with two options. You can either backup your data,
reinstall the operating system, and then reinstall all your applications
or you can restore your computer to a previous snapshot in the hopes
that the problems will now be gone. By using System Restore to restore
your computer to a previously known working state you can save
considerable time or money compared to reinstalling the entire computer.
System Restore points are automatically created when the following actions occur:-
When you install a new application or driver.
-
When you uninstall or install certain programs.
-
When you install new updates
-
Automatically on a daily interval
-
By manually creating one.
- If you choose to use system restore to restore to a previous restore point, system restore will create a new restore point prior to restoring a previous state in case something goes wrong. If you restore to a previous state in Safe Mode, a restore point will not be created for the current state.
In the case of a problem on your computer that cannot be solved by
normal means, you can restore your computer back to a previous working
state. To do this you need to start System Restore so that you can
choose the restore point to restore. If you are currently having
problems starting Windows Vista, you can use System Restore from the
Windows Recovery Environment.
If you can log into Windows Vista, then you should follow these steps.
-
Close and save any documents that you may have open.
-
Click on the Start button to open your Start Menu. The Start button looks like this:

-
When the Start Menu opens click on the All Programs menu option.
-
Click once on the Accessories Start Menu group.
-
Click once on the System Tools Start Menu group.
- Click once on the System Restore icon. After you click on the icon, if a User Account Control window opens you should click on the Continue button.
 Figure 1. System Restore Screen
By default, Vista will already have selected the Recommended restore
option. This restore point is one was made after a new program, driver,
or update was installed. If you would like to use this restore point,
you can click on the Next button to start the restore process. On
the other hand, if there is a more recent restore point that you would
like to restore you should select Choose a different restore point and press the Next
button. This will bring you to a screen, as shown in Figure 2, that
contains a listing of all the available restore points that you can
restore to.
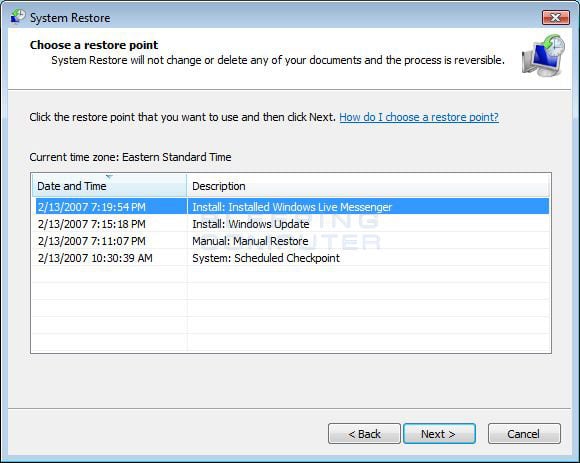 Figure 2. List of available restore points
You should select the restore point that you would like to restore and press the Next
button to start the restore process. Vista will display a Window
showing your selected restore point and asking you to confirm that this
is the one you would like to restore.
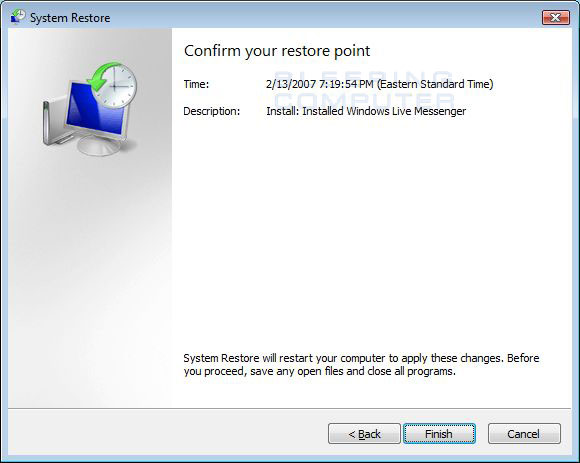 Figure 3. Confirm the selected restore point
If you would like to select a different restore point press the Back button. Otherwise you can press the Cancel button to exit System Restore or the Finish
button to begin the restore process. If you selected Finish, Vista will
display a second prompt asking you to confirm that you would like to
continue the restore.
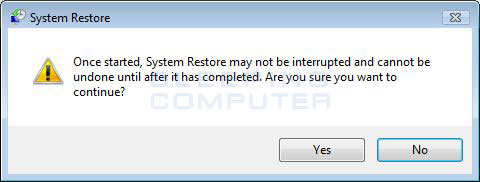 Figure 4. Second Confirmation
If you are sure you want to do the restore, then press the Yes button. Vista will now log you off of the computer and start the System Restore process as shown in Figure 5 below.
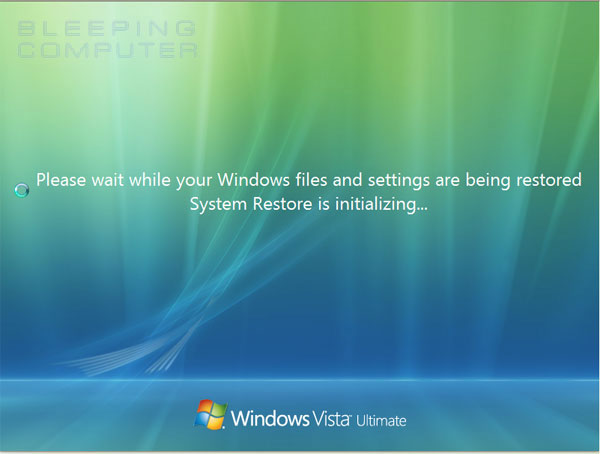 Figure 5. Restoring a restore point
When the restore has been completed, you computer will be restarted and
when Vista boots back up it will be restored to its previous state.
When you log in to Vista for the first time after the restore, you will
see a message showing that the restore was successful.
 Figure 6. System restore was successful
If there are any problems with your computer due to the last restore,
you can revert back to your previous settings by going back into the
System Restore Utility and selecting the Undo System Restore option and pressing the Next button.
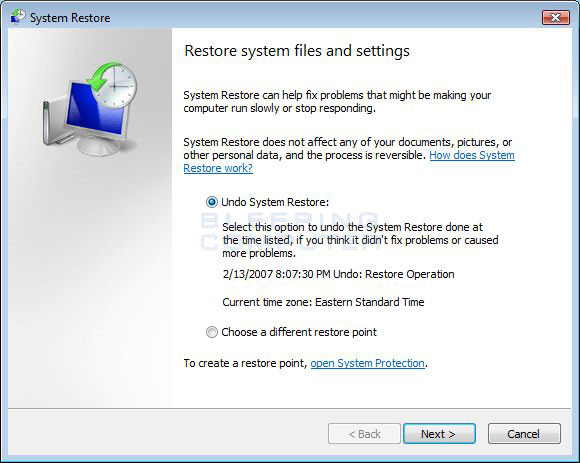 Figure 7. Undo the last System Restore
Your computer should now be working properly again.
Manually Creating Restore Points
As said previously, it is also possible to create manual restore points
as needed. Popular reasons to create manual restore points are when you
have your computer set up perfectly and would like to save the state in
the case of problems in the future. To create a manual restore point
you need to follow these steps:
-
Click on the Start button to open your Start Menu. The Start button looks like this:

-
Click on the Control Panel menu option.
-
Click on the System and Maintenance menu option.
-
Click on the System menu option.
- Click on System Protection in the left-hand task list.
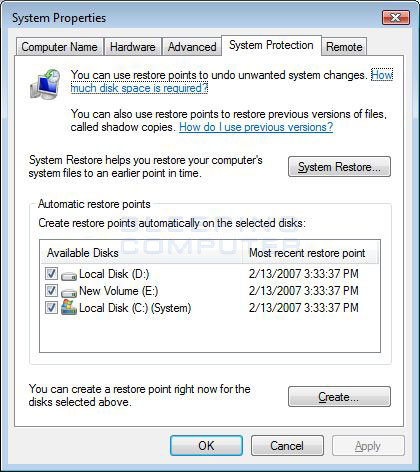 Figure 8. System Protection tab
To create the manual restore point you should click on the Create button. When you press this button a prompt will appear asking you to provide a title for this manual restore point.
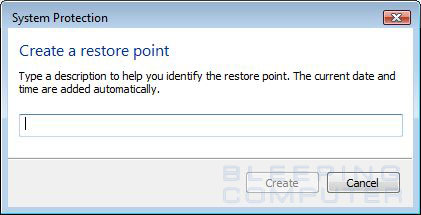 Figure 9. Enter title for manual restore point
Type in a title for the manual restore point and press the Create
button. Vista will now create a manual restore point, and when
completed, display a notice saying that it was created successfully.
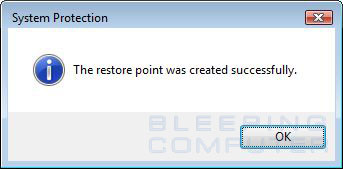 Figure 10. Manual restore point was created
Now that you have completed making the manual restore point you can close the System window.
Disabling System Restore
It is advised that you do not turn off System Restore unless you have specific need to do so.
WARNING: By disabling system restore you will delete all stored restore points and shadow copies of documents on your computer.
To disable System Restore you would follow these steps:
-
Click on the Start button to open your Start Menu. The Start button looks like this:

-
Click on the Control Panel menu option.
-
Click on the System and Maintenance menu option.
-
Click on the System menu option.
-
Click on System Protection in the left-hand task list.
-
Uncheck the checkboxes next to each hard drive listed under the Create restore points automatically on the selected disks: section. When you uncheck a disk you will be presented with the following screen.
 Figure 11. Turn off System Restore confirmation
You should click on the Turn System Protection Off button.
- Press the Apply button and then the OK button.
By default System Restore is enabled on Windows Vista computers so you will only need to enable it if you have previously disabled it. To enable System Restore do the following:
-
Click on the Start button to open your Start Menu. The Start button looks like this:

-
Click on the Control Panel menu option.
-
Click on the System and Maintenance menu option.
-
Click on the System menu option.
-
Click on System Protection in the left-hand task list.
-
Put a checkmark in the checkboxes next to each hard drive listed under the Create restore points automatically on the selected disks: section.
- Press the Apply button and then the OK button.
There are two safe ways to delete restore points stored on your computer. These ways are described below:
Turn off System Restore - When you turn off System Restore, all previously created restore points will be deleted.
System Restore runs out of storage space - If System
Restore runs out of allocated space it will delete the older restore
point in order to create free space in which to create the new restore
point.
If you are the owner Windows Vista Business, Ultimate, or Enterprise then you also have a feature called Shadow Copy available to you. Shadow Copy is a feature integrated into System Restore that makes copies of your documents when a restore point is created. You can then use these shadow copies to restore these files at a later date if they have been accidentally deleted or altered in some way. Since Shadow Copy is integrated into System Restore, if System Restore is disabled you will not be able to use Shadow Copy.
To use Shadow Copy to restore a particular file to a previous state you would right-click on the file and select the Restore previous versions option as shown in Figure 8 below.
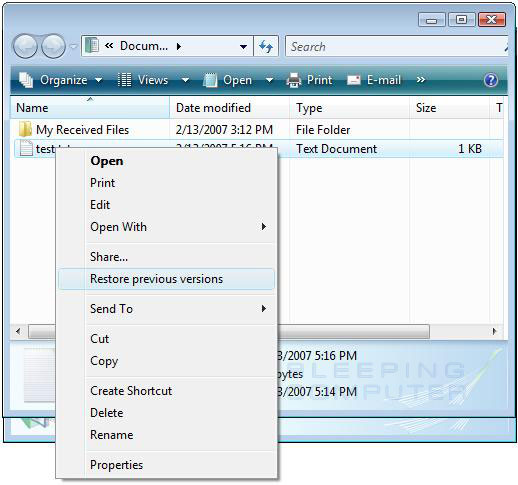
Figure 12. Restore Previous Versions
This will bring up a new screen showing the previous versions of the file that are available to restore as shown in Figure 9 below.
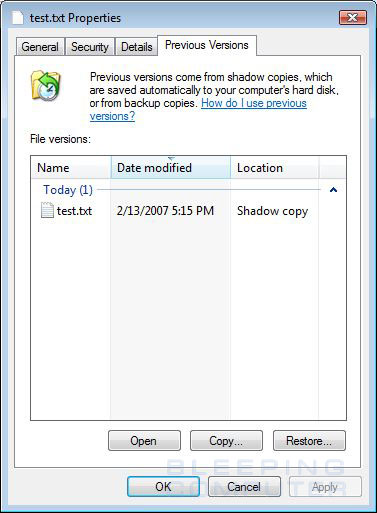
Figure 13. List of previous versions
When you select a version from the list you have three options.
-
You can open the previous version by clicking on the Open button. This allows you to view the contents of the file without overwriting your existing one.
-
If you would like to copy the older version to a new location you can click on the Copy button.
- If you would like to restore the previous version, and overwrite the existing one, you can click on the Restore button.
-
When in the folder that you would like to restore click on the Organize button and then select Properties.
-
Click on the Previous Versions tab.
- Select the date of the Shadow Copy you would like to restore and then select the Open, Copy, or Restore options as required.
The System Restore tool is a powerful feature that can be used to keep
your computer operating properly. Now when you run into a problem that
cannot be resolved normally, you can use System Restore to restore your
computer to a previous known working state. Even more powerful is the
ability to use system restore from the Windows Recovery Environment when
you can't properly boot up into Windows. This allows you a second
chance to get your computer operating as it should without having to do a
time consuming and possibly expensive reinstall.
As always if you have any comments, questions or suggestions about this tutorial please do not hesitate to tell me on my FaceBook page or Email me at: c.m.c.firerat@gmail.com
By FireRat

0 comments:
Post a Comment