HijackThis should only be used if your browser or computer is still having problems after running Spybot or another Spyware/Hijacker remover. HijackThis is an advanced tool, and therefore requires advanced knowledge about Windows and operating systems in general. If you delete items that it shows, without knowing what they are, it can lead to other problems such as your Internet no longer working or problems with running Windows itself. You should also attempt to clean the Spyware/Hijacker/Trojan with all other methods before using HijackThis. If you allow HijackThis to remove entries before another removal tool scans your computer, the files from the Hijacker/Spyware will still be left on your computer and future removal tools will not be able to find them.
If you do not have advanced knowledge about computers you should NOT fix entries using HijackThis without consulting an expert on using this program. If you have already run Spybot - S&D and Ad-Aware and are still having problems, then please continue with this tutorial
Introduction
HijackThis is a utility that produces a listing of certain settings found in your computer. HijackThis will scan your registry and various other files for entries that are similar to what a Spyware or Hijacker program would leave behind. Interpreting these results can be tricky as there are many legitimate programs that are installed in your operating system in a similar manner that Hijackers get installed. Therefore you must use extreme caution when having HijackThis fix any problems. I can not stress how important it is to follow the above warning.
There are two prevalent tutorials about HijackThis on the Internet currently, but neither of them explain what each of the sections actually mean in a way that a layman can understand. This tutorial, in addition, to showing how to use HijackThis, will also go into detail about each of the sections and what they actually mean. There is no reason why you should not understand what it is you are fixing when people examine your logs and tell you what to do.
With that said, lets move on to the tutorial on how to use it.
How to use HijackThis
HijackThis can be downloaded as a standalone executable or as an installer. The standalone application allows you to save and run HijackThis.exe from any folder you wish, while the installer will install HijackThis in a specific location and create desktop shortcuts to that executable. When using the standalone version you should not run it from your Temporary Internet Files folder as your backup folder will not be saved after you close the program. In order to avoid the deletion of your backups, please save the executable to a specific folder before running it. We suggest that you use the HijackThis installer as that has become the standard way of using the program and provides a safe location for HijackThis backups.
The first step is to download HijackThis to your computer in a location that you know where to find it again. HijackThis can be downloaded from the following link:
HijackThis Download LinkIf you have downloaded the standalone application, then simply navigate to the location where it was saved and double-click on the HiJackThis.msi/exe file in order to start the installation of HijackThis. When the install starts, click on the Install button to have HijackThis installed into the C:\Program Files\Trend Micro\HijackThis folder, create a desktop shortcut that can be used to run the program when you need to, and to automatically launch HijackThis for the first time.
You should now see a screen similar to the figure below:
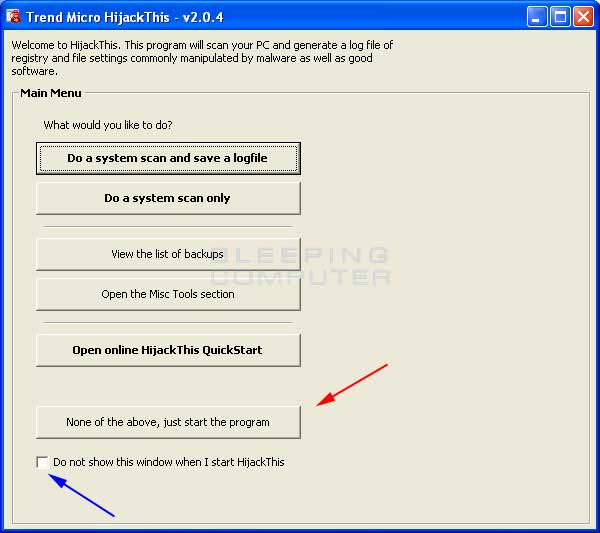
Figure 1. HijackThis Startup screen when run for the first time
We suggest you put a checkmark in the checkbox labeled Do not show this windows when I start HijackThis, designated by the blue arrow above, as most instructions you will given will not account for this screen. After you have put a checkmark in that checkbox, click on the None of the above, just start the program button, designated by the red arrow in the figure above. You will then be presented with the main HijackThis screen as seen in Figure 2 below.
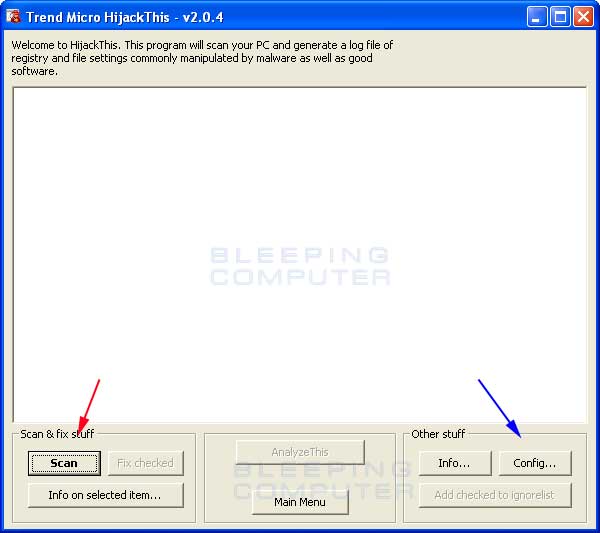
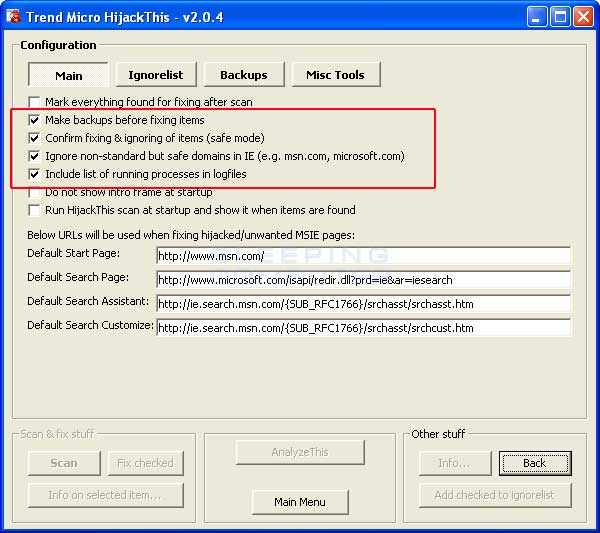
You should first click on the Config button, which is designated by the blue arrow in Figure 2, and confirm that your settings match those found in Figure 3 below. The options that should be checked are designated by the red arrow.
When you are done setting these options, press the back key and continue with the rest of the tutorial.
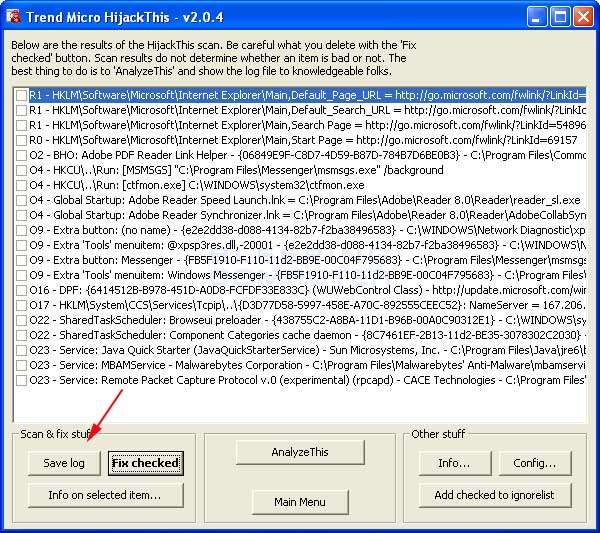
To have HijackThis scan your computer for possible Hijackers, click on the Scan button designated by the red arrow in Figure 2. You will then be presented with a screen listing all the items found by the program as seen in Figure 4.
At this point, you will have a listing of all items found by HijackThis.
If what you see seems confusing and daunting to you, then click on the Save Log button, designated by the red arrow, and save the log to your computer somewhere you will remember later.
If you would like to see information about any of the objects listed, you can click once on a listing, and then press the "Info on selected item..." button. This will bring up a screen similar to Figure 5 below:
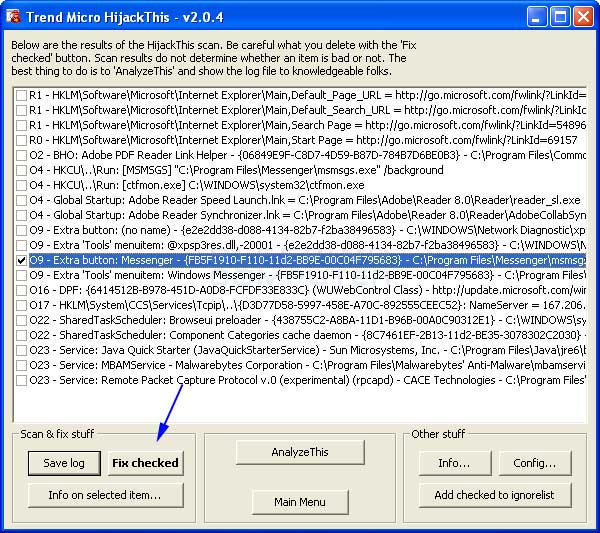
When you are done looking at the information for the various listings, and you feel that you are knowledgeable enough to continue, look through the listings and select the items you would like to remove by placing checkmarks in the checkboxes next to each listing as shown in Figure 6. At the end of the document we have included some basic ways to interpret the information in these log files. By no means is this information extensive enough to cover all decisions, but should help you determine what is legitimate or not.
Once you have selected the items you would like to remove, press the Fix Checked button, designated by the blue arrow, in Figure 6. HijackThis will then prompt you to confirm if you would like to remove those items. Press Yes or No depending on your choice.
How to restore items mistakenly deleted
HijackThis comes with a backup and restore procedure in the event that you erroneously remove an entry that is actually legitimate. If you have configured HijackThis as was shown in this tutorial, then you should be able to restore entries that you have previously deleted. If you have had your HijackThis program running from a temporary directory, then the restore procedure will not work.
If the configuration setting Make backups before fixing items is checked, HijackThis will make a backup of any entries that you fix in a directory called backups that resides in the same location as Hijackthis.exe.
If you start HijackThis and click on Config, and then the Backup button you will be presented with a screen like Figure 7 below. You will have a listing of all the items that you had fixed previously and have the option of restoring them. Once you restore an item that is listed in this screen, upon scanning again with HijackThis, the entries will show up again.
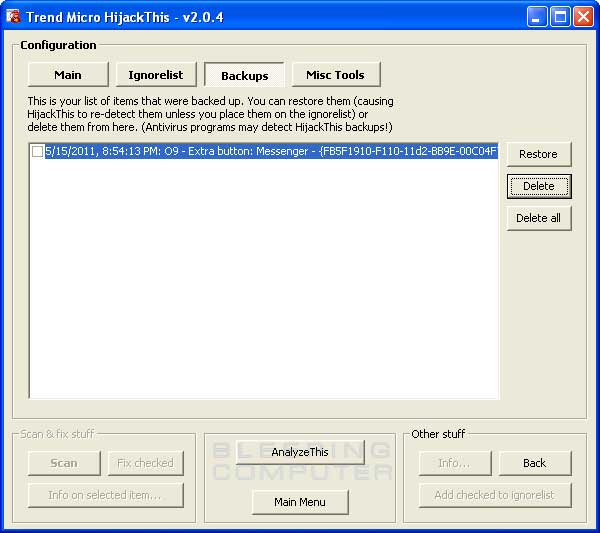
Figure 7. Restoring a mistakenly removed entry
Once you are finished restoring those items that were mistakenly fixed, you can close the program.
How to Generate a Startup Listing
At times when you post your log to a message forum asking for assistance, the people helping may ask you to generate a listing of all the programs that automatically start on your computer. HijackThis has a built in tool that will allow you to do this.
In order to do this go into the Config option when you start HijackThis, which is designated by the blue arrow in Figure 2, and then click on the Misc Tools button at the top. You should see a screen similar to Figure 8 below.
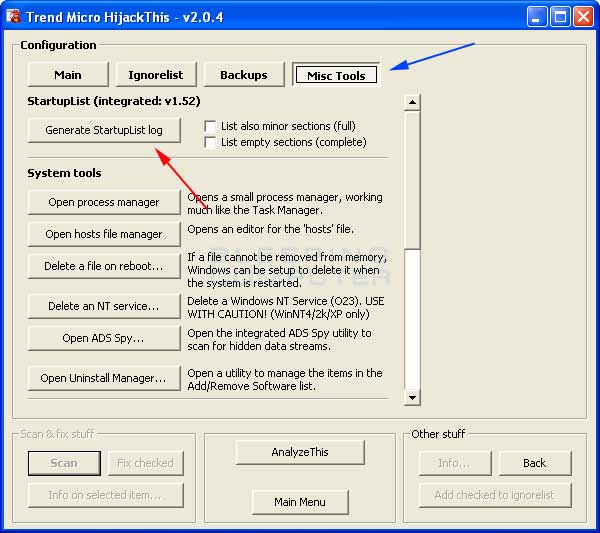
Figure 8. Generating a StartupList Log.
Hopefully with either your knowledge or help from others you will have cleaned up your computer. If you would like to learn more detailed information about what exactly each section in a scan log means, then continue reading.
How to use the Process Manager
HijackThis has a built in process manager that can be used to end processes as well as see what DLLs are loaded in that process. To access the process manager, you should click on the Config button and then click on the Misc Tools button. You should now see a new screen with one of the buttons being Open Process Manager. If you click on that button you will see a new screen similar to Figure 9 below.
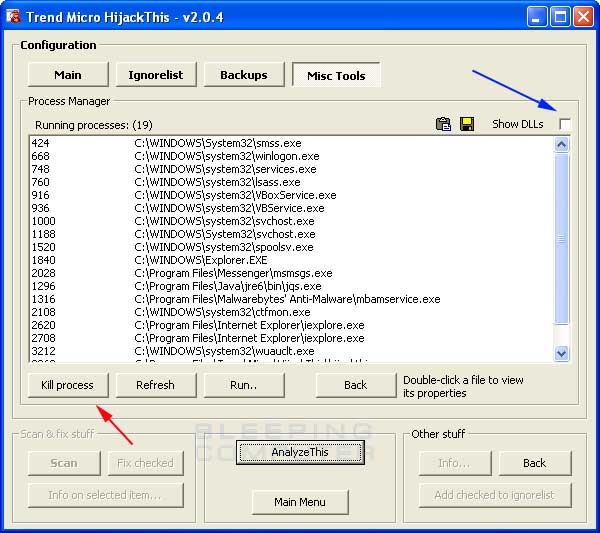
Figure 9. HijackThis Process Manager
If you would like to terminate multiple processes at the same time, press and hold down the control key on your keyboard. While that key is pressed, click once on each process that you want to be terminated. As long as you hold down the control button while selecting the additional processes, you will be able to select multiple processes at one time. When you have selected all the processes you would like to terminate you would then press the Kill Process button.
If you would like to see what DLLs are loaded in a selected process, you can put a checkmark in the checkbox labeled Show DLLs, designated by the blue arrow in the figure above. This will split the process screen into two sections. The first section will list the processes like before, but now when you click on a particular process, the bottom section will list the DLLs loaded in that process.
To exit the process manager you need to click on the back button twice which will place you at the main screen.
How to use the Hosts File Manager
HijackThis also has a rudimentary Hosts file manager. With this manager you can view your hosts file and delete lines in the file or toggle lines on or off. To access the Hosts file manager, you should click on the Config button and then click on the Misc Tools button. You should now see a new screen with one of the buttons being Hosts File Manager. If you click on that button you will see a new screen similar to Figure 10 below.
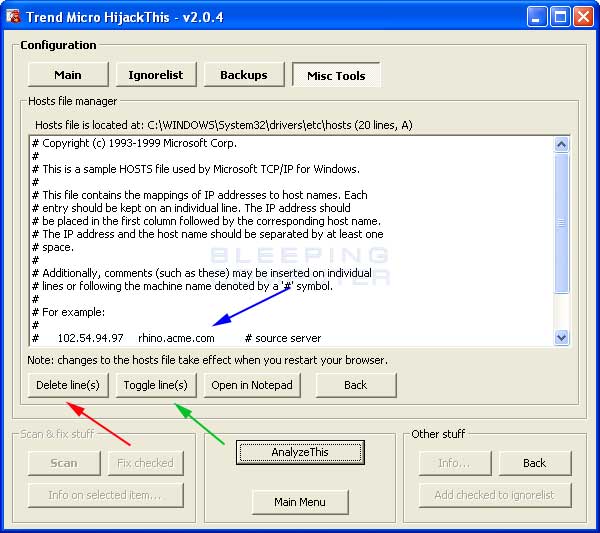
Figure 10: Hosts File Manager
This window will list the contents of your HOSTS file. To delete a line in your hosts file you would click on a line like the one designated by the blue arrow in Figure 10 above. This will select that line of text. Then you can either delete the line, by clicking on the Delete line(s) button, or toggle the line on or off, by clicking on the Toggle line(s) button. It is possible to select multiple lines at once using the shift and control keys or dragging your mouse over the lines you would like to interact with.
If you delete the lines, those lines will be deleted from your HOSTS file. If you toggle the lines, HijackThis will add a # sign in front of the line. This will comment out the line so that it will not be used by Windows. If you are unsure as to what to do, it is always safe to Toggle the line so that a # appears before it.
To exit the Hosts file manager you need to click on the back button twice which will place you at the main screen.
How to use the Delete on Reboot tool
At times you may find a file that stubbornly refuses to be deleted by conventional means. HijackThis introduced, in version 1.98.2, a method to have Windows delete the file as it boots up, before the file has the chance to load. To do this follow these steps:
- Start Hijackthis
- Click on the Config button
- Click on the Misc Tools button
- Click on the button labeled Delete a file on reboot...
- A new window will open asking you to select the file that you would like to delete on reboot. Navigate to the file and click on it once, and then click on the Open button.
- You will now be asked if you would like to reboot your computer to delete the file. Click on the Yes button if you would like to reboot now, otherwise click on the No button to reboot later.
How to use ADS Spy
There is a particular infection called Home Search Assistant or CWS_NS3 that will sometimes use a file called an Alternate Data Stream File to infect your computer. These files can not be seen or deleted using normal methods. ADS Spy was designed to help in removing these types of files.
To use the ADS Spy utility you would start HijackThis and then click on the Config button. Then click on the Misc Tools button and finally click on the ADS Spy button. When the ADS Spy utility opens you will see a screen similar to figure 11 below.
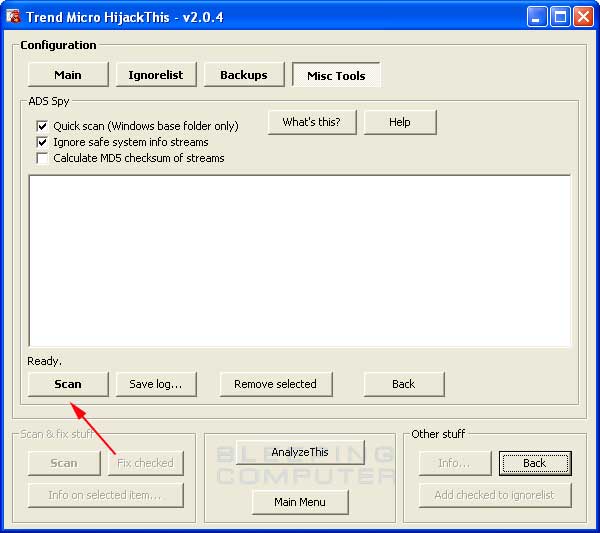
Figure 11: ADS Spy
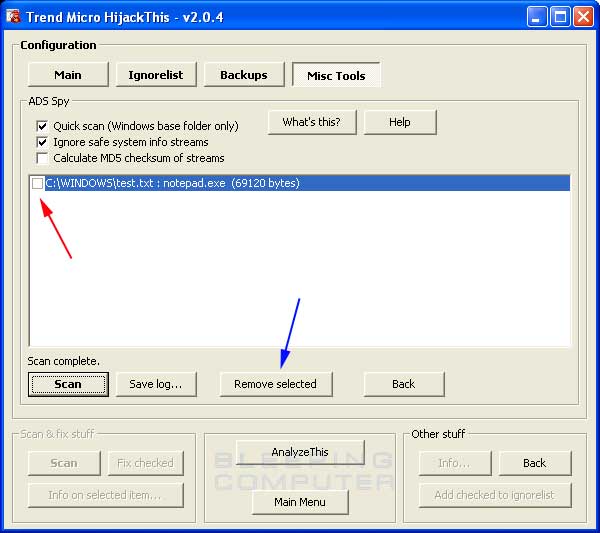
Figure 12: Listing of found Alternate Data Streams
How to use the Uninstall Manager
The Uninstall Manager allows you to manage the entries found in your control panel's Add/Remove Programs list. When cleaning malware from a machine entries in the Add/Remove Programs list invariably get left behind. Many users understandably like to have a clean Add/Remove Programs list and have difficulty removing these errant entries. Using the Uninstall Manager you can remove these entries from your uninstall list.
To access the Uninstall Manager you would do the following:
- Start HijackThis
- Click on the Config button
- Click on the Misc Tools button
- Click on the Open Uninstall Manager button.
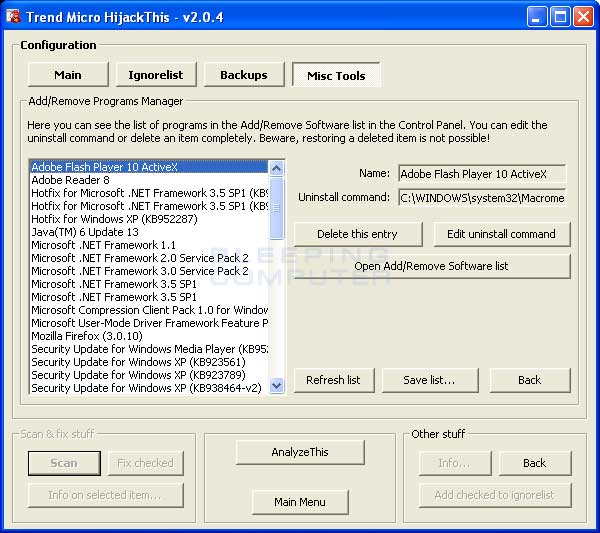
Figure 13: HijackThis Uninstall Manager
If you are asked to save this list and post it so someone can examine it and advise you as to what you should remove, you can click on the Save list... button and specify where you would like to save this file. When you press Save button a notepad will open with the contents of that file. Simply copy and paste the contents of that notepad into a reply in the topic you are getting help in.
How to interpret the scan listings
This next section is to help you diagnose the output from a HijackThis scan.
Every line on the Scan List for HijackThis starts with a section name. Below is a list of these section names and their explanations. You can click on a section name to bring you to the appropriate section.
Section Name
|
Description
|
| R0, R1, R2, R3 | Internet Explorer Start/Search pages URLs |
| F0, F1, F2,F3 | Auto loading programs |
| N1, N2, N3, N4 | Netscape/Mozilla Start/Search pages URLs |
| O1 | Hosts file redirection |
| O2 | Browser Helper Objects |
| O3 | Internet Explorer toolbars |
| O4 | Auto loading programs from Registry |
| O5 | IE Options icon not visible in Control Panel |
| O6 | IE Options access restricted by Administrator |
| O7 | Regedit access restricted by Administrator |
| O8 | Extra items in the IE right-click menu |
| O9 | Extra buttons on main IE button toolbar, or extra items in IE 'Tools' menu |
| O10 | Winsock hijacker |
| O11 | Extra group in IE 'Advanced Options' window |
| O12 | IE plugins |
| O13 | IE Default Prefix hijack |
| O14 | 'Reset Web Settings' hijack |
| O15 | Unwanted site in Trusted Zone |
| O16 | ActiveX Objects (aka Downloaded Program Files) |
| O17 | Lop.com/Domain Hijackers |
| O18 | Extra protocols and protocol hijackers |
| O19 | User style sheet hijack |
| O20 | AppInit_DLLs Registry value Autorun |
| O21 | ShellServiceObjectDelayLoad |
| O22 | SharedTaskScheduler |
| O23 | Windows XP/NT/2000 Services |
| O24 | Windows Active Desktop Components |
It is important to note that certain sections use an internal white list so that HijackThis will not show known legitimate files. To disable this white list you can start hijackthis in this method instead: hijackthis.exe /ihatewhitelists.
In our explanations of each section we will try to explain in layman terms what they mean. We will also tell you what registry keys they usually use and/or files that they use. Finally we will give you recommendations on what to do with the entries.
R0,R1,R2,R3 Sections
This section covers the Internet Explorer Start Page, Home Page, and Url Search Hooks.
R0 is for Internet Explorers starting page and search assistant.
R1 is for Internet Explorers Search functions and other characteristics.
R2 is not used currently.
R3 is for a Url Search Hook. An Url Search Hook is used when you type an address in the location field of the browser, but do not include a protocol such as http:// or ftp:// in the address. When you enter such an address, the browser will attempt to figure out the correct protocol on its own, and if it fails to do so, will use the UrlSearchHook listed in the R3 section to try to find the location you entered.
| Some Registry Keys: | HKLM\Software\Microsoft\Internet Explorer\Main,Start Page |
| HKCU\Software\Microsoft\Internet Explorer\Main: Start Page | |
| HKLM\Software\Microsoft\Internet Explorer\Main: Default_Page_URL | |
| HKCU\Software\Microsoft\Internet Explorer\Main: Default_Page_URL | |
| HKLM\Software\Microsoft\Internet Explorer\Main: Search Page | |
| HKCU\Software\Microsoft\Internet Explorer\Main: Search Page | |
| HKCU\Software\Microsoft\Internet Explorer\SearchURL: (Default) | |
| HKCU\Software\Microsoft\Internet Explorer\Main: Window Title | |
| HKCU\Software\Microsoft\Windows\CurrentVersion\Internet Settings: ProxyOverride | |
| HKCU\Software\Microsoft\Internet Connection Wizard: ShellNext | |
| HKCU\Software\Microsoft\Internet Explorer\Main: Search Bar | |
| HKEY_CURRENT_USER\Software\Microsoft\Internet Explorer\URLSearchHooks | |
| HKLM\Software\Microsoft\Internet Explorer\Search,CustomizeSearch = | |
| HKCU\Software\Microsoft\Internet Explorer\Search,CustomizeSearch | |
| HKLM\Software\Microsoft\Internet Explorer\Search,SearchAssistant |
| Example Listing | R0 - HKCU\Software\Microsoft\Internet Explorer\Main,Start Page = http://www.google.com/ |
A common question is what does it mean when the word Obfuscated is next to one of these entries. When something is obfuscated that means that it is being made difficult to perceive or understand. In Spyware terms that means the Spyware or Hijacker is hiding an entry it made by converting the values into some other form that it understands easily, but humans would have trouble recognizing, such as adding entries into the registry in Hexadecimal. This is just another method of hiding its presence and making it difficult to be removed.
If you do not recognize the web site that either R0 and R1 are pointing to, and you want to change it, then you can have HijackThis safely fix these, as they will not be detrimental to your Internet Explorer install. If you would like to see what sites they are, you can go to the site, and if it's a lot of popups and links, you can almost always delete it. It is important to note that if an RO/R1 points to a file, and you fix the entry with HijackThis, Hijackthis will not delete that particular file and you will have to do it manually.
There are certain R3 entries that end with a underscore ( _ ) . An example of what one would look like is:
R3 - URLSearchHook: (no name) - {CFBFAE00-17A6-11D0-99CB-00C04FD64497}_ - (no file)
Notice the CLSID, the numbers between the { }, have a _ at the end of it and they may sometimes difficult to remove with HijackThis. To fix this you will need to delete the particular registry entry manually by going to the following key:
HKEY_CURRENT_USER\Software\Microsoft\Internet Explorer\URLSearchHooks
Then delete the CLSID entry under it that you would like to remove. Please leave the CLSID , CFBFAE00-17A6-11D0-99CB-00C04FD64497, as it is the valid default one.
Unless you recognize the software being used as the UrlSearchHook, you should generally Google it and after doing some research, allow HijackThis to fix it
F0, F1, F2, F3 Sections
These sections cover applications that are loaded from your .INI files, system.ini and win.ini, in Windows ME and below or their equivalent places in the registry for Windows NT based versions. The Windows NT based versions are XP, 2000, 2003, and Vista.
A F0 entry corresponds to the Shell= statement, under the [Boot] section, of the System.ini file. The Shell= statement in the system.ini file is used to designate what program would act as the shell for the operating system.
| Example Listing: | F0 - system.ini: Shell=Explorer.exe badprogram.exe |
| Files Used: | c:\windows\system.ini |
A F1 entry corresponds to the Run= or Load= entry in the win.ini file. Like the system.ini file, the win.ini file is typically only used in Windows ME and below.
| Example Listing | F1 - win.ini: load=bad.pif F1 - win.ini: run=evil.pif |
| Files Used: | c:\windows\win.ini |
F2 and F3 entries correspond to the equivalent locations as F0 and F1, but they are instead stored in the registry for Windows versions XP, 2000, and NT. These versions of Windows do not use the system.ini and win.ini files. Instead for backwards compatibility they use a function called IniFileMapping. IniFileMapping, puts all of the contents of an .ini file in the registry, with keys for each line found in the .ini key stored there. Then when you run a program that normally reads their settings from an .ini file, it will first check the registry key HKEY_LOCAL_MACHINE\SOFTWARE\Microsoft\Windows NT\CurrentVersion\IniFileMapping for an .ini mapping, and if found will read the settings from there instead. You can see that these entries, in the examples below, are referring to the registry as it will contain REG and then the .ini file which IniFileMapping is referring to.
F2 entries are displayed when there is a value that is not whitelisted, or considered safe, in the registry key HKEY_LOCAL_MACHINE\SOFTWARE\Microsoft\Windows NT\CurrentVersion\Winlogon under the values Shell and Userinit.
| Example Listings: | F2 - REG:system.ini: UserInit=userinit,nddeagnt.exe |
| F2 - REG:system.ini: Shell=explorer.exe beta.exe | |
| Registry Keys: | HKLM\Software\Microsoft\Windows NT\CurrentVersion\Winlogon\Userinit |
| HKLM\Software\Microsoft\Windows NT\CurrentVersion\Winlogon\Shell |
F3 entries are displayed when there is a value that is not whitelisted in the registry key HKCU\Software\Microsoft\Windows NT\CurrentVersion\Windows under the values load and run. These entries are the Windows NT equivalent of those found in the F1 entries as described above.
| Example Listings: | F3 - REG:win.ini: load=chocolate.exe |
| F3 - REG:win.ini: run=beer.exe | |
| Registry Keys: | HKCU\Software\Microsoft\Windows NT\CurrentVersion\Windows\load |
| HKCU\Software\Microsoft\Windows NT\CurrentVersion\Windows\run |
For F1 entries you should google the entries found here to determine if they are legitimate programs. You can also search at the sites below for the entry to see what it does.
For F2, if you see UserInit=userinit.exe, with or without nddeagnt.exe, as in the above example, then you can leave that entry alone. If you see UserInit=userinit.exe (notice no comma) that is still ok, so you should leave it alone. If you see another entry with userinit.exe, then that could potentially be a trojan or other malware. The same goes for F2 Shell=; if you see explorer.exe by itself, it should be fine, if you don't, as in the above example listing, then it could be a potential trojan or malware. You can generally delete these entries, but you should consult Google and the sites listed below.
Please be aware that when these entries are fixed HijackThis does not delete the file associated with it. You must manually delete these files.
N1, N2, N3, N4 Sections
These sections are for Netscape and Mozilla Browsers Start and default search pages.
These entries are stored in the prefs.js files stored in different places under the C:\Documents and Settings\YourUserName\Application Data folder. Netscape 4's entries are stored in the prefs.js file in the program directory which is generally, DriveLetter:\Program Files\Netscape\Users\default\prefs.js.
N1 corresponds to the Netscape 4's Startup Page and default search page.
N2 corresponds to the Netscape 6's Startup Page and default search page.
N3 corresponds to Netscape 7' Startup Page and default search page.
N4 corresponds to Mozilla's Startup Page and default search page.
Files Used: prefs.js
As most spyware and hijackers tend to target Internet Explorer these are usually safe. If you see web sites listed in here that you have not set, you can use HijackThis to fix it. There is one known site that does change these settings, and that is Lop.com.
O1 Section
This section corresponds to Host file Redirection.
The hosts file contains mappings for hostnames to IP addresses.For example, if I enter in my host file:
127.0.0.1 www.bleepingcomputer.com
and you try to go to www.bleepingcomputer.com, it will check the hosts file, see the entry and convert that to the IP address of 127.0.0.1 instead of its correct address.
Host file redirection is when a hijacker changes your hosts file to redirect your attempts to reach a certain web site to another site. So if someone added an entry like:
127.0.0.1 www.google.com
and you tried to go to www.google.com, you would instead get redirected to 127.0.0.1 which is your own computer.
| Example Listing | O1 - Hosts: 192.168.1.1 www.google.com |
| Operating System |
Location
|
| Windows 3.1 | C:\WINDOWS\HOSTS |
| Windows 95 | C:\WINDOWS\HOSTS |
| Windows 98 | C:\WINDOWS\HOSTS |
| Windows ME | C:\WINDOWS\HOSTS |
| Windows XP | C:\WINDOWS\SYSTEM32\DRIVERS\ETC\HOSTS |
| Windows NT | C:\WINNT\SYSTEM32\DRIVERS\ETC\HOSTS |
| Windows 2000 | C:\WINNT\SYSTEM32\DRIVERS\ETC\HOSTS |
| Windows 2003 | C:\WINDOWS\SYSTEM32\DRIVERS\ETC\HOSTS |
Registry Key: HKEY_LOCAL_MACHINE\System\CurrentControlSet\Services\Tcpip\Parameters\: DatabasePath
If you see entries like the above example, and they are not their for a specific reason that you know about, you can safely remove them.
If you see an entry Hosts file is located at C:\Windows\Help\hosts, that means you are infected with the CoolWebSearch. If the Hosts file is located in a location that is not the default for your operating system, see table above, then you should have HijackThis fix this as it is most likely caused by an infection.
You can also download the program HostsXpert which gives you the ability to restore the default host file back onto your machine. To do so, download the HostsXpert program and run it. When it opens, click on the Restore Original Hosts button and then exit HostsXpert.
O2 Section
This section corresponds to Browser Helper Objects.
Browser helper objects are plugins to your browser that extend the functionality of it. They can be used by spyware as well as legitimate programs such as Google Toolbar and Adobe Acrobat Reader. You must do your research when deciding whether or not to remove any of these as some may be legitimate.
Registry Keys: HKLM\SOFTWARE\Microsoft\Windows\CurrentVersion\Explorer\Browser Helper Objects
| Example Listing | O2 - BHO: NAV Helper - {BDF3E430-B101-42AD-A544-FADC6B084872} - C:\Program Files\Norton Antivirus\NavShExt.dll |
When you fix these types of entries with HijackThis, HijackThis will attempt to the delete the offending file listed. There are times that the file may be in use even if Internet Explorer is shut down. If the file still exists after you fix it with HijackThis, it is recommended that you reboot into safe mode and delete the offending file.
O3 Section
This section corresponds to Internet Explorer toolbars.
These are the toolbars that are underneath your navigation bar and menu in Internet Explorer.
Registry Keys: HKLM\SOFTWARE\Microsoft\Internet Explorer\Toolbar
| Example Listing | O3 - Toolbar: Norton Antivirus - {42CDD1BF-3FFB-4238-8AD1-7859DF00B1D6} - C:\Program Files\Norton Antivirus\NavShExt.dll |
When you fix these types of entries, HijackThis will not delete the offending file listed. It is recommended that you reboot into safe mode and delete the offending file.
O4 Section
This section corresponds to certain registry keys and startup folders that are used to automatically start an application when Windows starts. O4 keys are the HJT entries that the majority of programs use to autostart, so particular care must be used when examining these keys. The O4 Registry keys and directory locations are listed below and apply, for the most part, to all versions of Windows.
As of HijackThis version 2.0, HijackThis will also list entries for other users that are actively logged into a computer at the time of the scan by reading the information from the HKEY_USERS registry key. If a user is not logged on at the time of the scan, their user key will not be loaded, and therefore HijackThis will not list their autoruns. When working on HijackThis logs it is not advised to use HijackThis to fix entries in a person's log when the user has multiple accounts logged in. We advise this because the other user's processes may conflict with the fixes we are having the user run.
The current locations that O4 entries are listed from are:
Directory Locations:
User's Startup Folder: Any files located in a user's Start Menu Startup folder will be listed as a O4 - Startup. This location, for the newer versions of Windows, are C:\Documents and Settings\USERNAME\Start Menu\Programs\Startup or under C:\Users\USERNAME\AppData\Roaming\Microsoft\Windows\Start Menu in Vista. These entries will be executed when the particular user logs onto the computer.Startup Registry Keys: O4 entries that utilize registry keys will start with the abbreviated registry key in the entry listing. Examples and their descriptions can be seen below. For all of the keys below, if the key is located under HKCU, then that means the program will only be launched when that particular user logs on to the computer. If the entry is located under HKLM, then the program will be launched for all users that log on to the computer.
All Users Startup Folder: These items refer to applications that load by having them in the All Users profile Start Menu Startup Folder and will be listed as O4 - Global Startup. This location, for the newer versions of Windows, are C:\Documents and Settings\All Users\Start Menu\Programs\Startup or under C:\ProgramData\Microsoft\Windows\Start Menu\Programs\Startup in Vista. These entries will be executed when any user logs onto the computer.
Note: In the listing below, HKLM stands for HKEY_LOCAL_MACHINE and HKCU stands for HKEY_CURRENT_USER.
The Run keys are used to launch a program automatically when a user, or all users, logs on to the machine.
| Run keys: |
| HKLM\Software\Microsoft\Windows\CurrentVersion\Run |
| HKCU\Software\Microsoft\Windows\CurrentVersion\Run |
The RunOnce keys are used to launch a service or background process whenever a user, or all users, logs on to the computer. Once the program is successfully launched for the first time its entry will be removed from the Registry so it does not run again on subsequent logons.
| RunOnce keys: |
| HKLM\Software\Microsoft\Windows\CurrentVersion\RunOnce |
| HKCU\Software\Microsoft\Windows\CurrentVersion\RunOnce |
The RunServices keys are used to launch a service or background process whenever a user, or all users, logs on to the computer.
| RunServices keys: |
| HKLM\Software\Microsoft\Windows\CurrentVersion\RunServices |
| HKCU\Software\Microsoft\Windows\CurrentVersion\RunServices |
The RunServicesOnce keys are used to launch a service or background process whenever a user, or all users, logs on to the computer. Unlike the RunServices keys, when a program is launched from the RunServicesOnce key its entry will be removed from the Registry so it does not run again on subsequent logons.
| RunServicesOnce keys: |
| HKLM\Software\Microsoft\Windows\CurrentVersion\RunServicesOnce |
| HKCU\Software\Microsoft\Windows\CurrentVersion\RunServicesOnce |
The RunOnceEx keys are used to launch a program once and then remove itself from the Registry. This particular key is typically used by installation or update programs.
| RunOnceEx key: |
| HKLM\Software\Microsoft\Windows\CurrentVersion\RunOnceEx |
The Policies\Explorer\Run keys are used by network administrator's to set a group policy settings that has a program automatically launch when a user, or all users, logs on to the computer. Under the Policies\Explorer\Run key are a series of values, which have a program name as their data. When a user, or all users, logs on to the computer each of the values under the Run key is executed and the corresponding programs are launched.
| Policies\Explorer\Run keys: |
| HKLM\Software\Microsoft\Windows\CurrentVersion\Policies\Explorer\Run |
| HKCU\Software\Microsoft\Windows\CurrentVersion\Policies\Explorer\Run |
A sample of the type of O4 listings that you can see in HijackThis can be seen below:
| Example Listings: | 04 - HKLM\..\Run: [nwiz] nwiz.exe /install |
| O4 - Global Startup: Adobe Reader Speed Launch.lnk = D:\Program Files\Adobe\Acrobat 7.0\Reader\reader_sl.exe | |
| O4 - HKLM\..\Policies\Explorer\Run: [user32.dll] C:\Program Files\Video ActiveX Access\iesmn.exe | |
| O4 - S-1-5-21-1222272861-2000431354-1005 Startup: numlock.vbs (User 'BleepingComputer.com') | |
| O4 - HKUS\S-1-5-21-1229272821-2000478354--1005\..\Run: [Windows Defender] "C:\Program Files\Windows Defender\MSASCui.exe" -hide (User 'BleepingComputer.com') |
-
04 - HKLM\..\Run: [nwiz] nwiz.exe /install - This entry corresponds to a startup launching from HKLM\Software\Microsoft\Windows\CurrentVersion\Run for the currently logged in user. The name of the Registry value is nwiz and when the entry is started it will launch the nwiz.exe /install command.
-
O4 - Global Startup: Adobe Reader Speed Launch.lnk = D:\Program Files\Adobe\Acrobat 7.0\Reader\reader_sl.exe - This entry corresponds to a program started by the All Users Startup Folder located at C:\Documents and Settings\All Users\Start Menu\Programs\Startup.
-
O4 - HKLM\..\Policies\Explorer\Run: [user32.dll] C:\Program Files\Video ActiveX Access\iesmn.exe - This entry corresponds to a value located under the HKLM\Software\Microsoft\Windows\CurrentVersion\Policies\Explorer\Run key. The name of the Registry value is user32.dll and its data is C:\Program Files\Video ActiveX Access\iesmn.exe. This particular example happens to be malware related.
-
O4 - S-1-5-21-1222272861-2000431354-1005 Startup: numlock.vbs (User 'BleepingComputer.com') - This
particular entry is a little different. As you can see there is a long
series of numbers before and it states at the end of the entry the user
it belongs to. Those numbers in the beginning are the user's SID, or
security identifier, and is a number that is unique to each user on your
computer. This SID translates to the BleepingComputer.com Windows user
as shown at the end of the entry. The rest of the entry is the same as a
normal one, with the program being launched from a user's Start Menu
Startup folder and the program being launched is numlock.vbs.
- O4 - HKUS\S-1-5-21-1222272861-2000431354-1005\..\Run: [Windows Defender] "C:\Program Files\Windows Defender\MSASCui.exe" -hide (User 'BleepingComputer.com') - This type of entry is similar to the first example, except that it belongs to the BleepingComputer.com user. This is just another example of HijackThis listing other logged in user's autostart entries.
O5 Section
This section corresponds to having your Internet Explorer control show in the Control Panel.
It is possible to disable the seeing of a control in the Control Panel by adding an entry into the file called control.ini which is stored, for Windows XP at least, in c:\windows\control.ini. From within that file you can specify which specific control panels should not be visible.
Files User: control.ini
| Example Listing | O5 - control.ini: inetcpl.cpl=no |
O6 Section
This section corresponds to an Administrative lock down for changing the options or homepage in Internet explorer by changing certain settings in the registry.
Registry Key: HKCU\Software\Policies\Microsoft\Internet Explorer\Restrictions
| Example Listing | O6 - HKCU\Software\Policies\Microsoft\Internet Explorer\Restrictions |
O7 Section
This section corresponds to Regedit not being allowed to run by changing an entry in the registry.
Registry Key: HKCU\Software\Microsoft\Windows\CurrentVersion\Policies\System
| Example Listing | O7 - HKCU\Software\Microsoft\Windows\CurrentVersion\Policies\System: DisableRegedit=1 |
O8 Section
This section corresponds to extra items being found in the in the Context Menu of Internet Explorer.
Registry Key: HKEY_CURRENT_USER\Software\Microsoft\Internet Explorer\MenuExt
| Example Listing | O8 - Extra context menu item: &Google Search - res://c:\windows\GoogleToolbar1.dll/cmsearch.html |
When you fix these types of entries, HijackThis does not delete the file listed in the entry. If you need to remove this file, it is recommended that you reboot into safe mode and delete the file there.
O9 Section
This section corresponds to having buttons on main Internet Explorer toolbar or items in the Internet Explorer 'Tools' menu that are not part of the default installation.
Registry Key: HKEY_LOCAL_MACHINE\SOFTWARE\Microsoft\Internet Explorer\Extensions registry key.
| Example Listing | O9 - Extra Button: AIM (HKLM) |
When you fix these types of entries, HijackThis will not delete the offending file listed. It is recommended that you reboot into safe mode and delete the offending file.
O10 Section
This section corresponds to Winsock Hijackers or otherwise known as LSP (Layered Service Provider).
LSPs are a way to chain a piece of software to your Winsock 2 implementation on your computer. Since the LSPs are chained together, when Winsock is used, the data is also transported through each of the LSPs in the chain. Spyware and Hijackers can use LSPs to see all traffic being transported over your Internet connection.
You should use extreme caution when deleting these objects if it is removed without properly fixing the gap in the chain, you can have loss of Internet access.
| Example Listing | O10 - Broken Internet access because of LSP provider 'spsublsp.dll' missing |
Spybot can generally fix these but make sure you get the latest version as the older ones had problems. There is a tool designed for this type of issue that would probably be better to use, called LSPFix. For a great list of LSP and whether or not they are valid you can visit SystemLookup's LSP List Page.
O11 Section
This section corresponds to a non-default option group that has been added to the Advanced Options Tab in Internet Options on IE.
If you look in your Internet Options for Internet Explorer you will see an Advanced Options tab. It is possible to add an entry under a registry key so that a new group would appear there.
Registry Key: HKEY_LOCAL_MACHINE\SOFTWARE\Microsoft\Internet Explorer\AdvancedOptions
| Example Listing | O11 - Options group: [CommonName] CommonName |
O12 Section
This section corresponds to Internet Explorer Plugins.
Internet Explorer Plugins are pieces of software that get loaded when Internet Explorer starts to add functionality to the browser. There are many legitimate plugins available such as PDF viewing and non-standard image viewers.
Registry key: HKEY_LOCAL_MACHINE\software\microsoft\internet explorer\plugins
| Example Listing | Plugin for .PDF: C:\Program Files\Internet Explorer\PLUGINS\nppdf32.dll |
When you fix these types of entries with HijackThis, HijackThis will attempt to the delete the offending file listed. There are times that the file may be in use even if Internet Explorer is shut down. If the file still exists after you fix it with HijackThis, it is recommended that you reboot into safe mode and delete the offending file.
O13 Section
This section corresponds to an IE DefaultPrefix hijack.
The default prefix is a setting on Windows that specifies how URLs that you enter without a preceding, http://, ftp://, etc are handled. By default Windows will attach a http:// to the beginning, as that is the default Windows Prefix. It is possible to change this to a default prefix of your choice by editing the registry. The Hijacker known as CoolWebSearch does this by changing the default prefix to a http://ehttp.cc/?. That means when you connect to a url, such as www.google.com, you will actually be going to http://ehttp.cc/?www.google.com, which is actually the web site for CoolWebSearch.
Registry Key: HKEY_LOCAL_MACHINE\SOFTWARE\Microsoft\Windows\CurrentVersion\URL\DefaultPrefix\
| Example Listing | O13 - WWW. Prefix: http://ehttp.cc/? |
If CWShredder does not find and fix the problem, you should always let HijackThis fix this entry when it is found.
O14 Section
This section corresponds to a 'Reset Web Settings' hijack.
There is a file on your computer that Internet Explorer uses when you reset options back to their Windows default. That file is stored in c:\windows\inf\iereset.inf and contains all the default settings that will be used. When you reset a setting, it will read that file and change the particular setting to what is stated in the file. If a Hijacker changes the information in that file, then you will get re infected when you reset that setting, as it will read the incorrect information from the iereset.inf file.
| Example Listing | O14 - IERESET.INF: START_PAGE_URL=http://www.searchalot.com |
O15 Section
This section corresponds to sites or IP addresses in the Internet Explorer Trusted Zone and Protocol Defaults.
Trusted Zone
Internet Explorer's security is based upon a set of zones. Each zone has different security in terms of what scripts and applications can be run from a site that is in that zone. There is a security zone called the Trusted Zone. This zone has the lowest security and allows scripts and applications from sites in this zone to run without your knowledge. It is therefore a popular setting for malware sites to use so that future infections can be easily done on your computer without your knowledge as these sites will be in the Trusted Zone..
| Registry Keys | HKEY_LOCAL_MACHINE\SOFTWARE\Microsoft\Windows\CurrentVersion\Internet Settings\ZoneMap\Domains |
| HKEY_CURRENT_USER\SOFTWARE\Microsoft\Windows\CurrentVersion\Internet Settings\ZoneMap\Domains | |
| HKEY_LOCAL_MACHINE\SOFTWARE\Microsoft\Windows\CurrentVersion\Internet Settings\ZoneMap\Ranges | |
| HKEY_CURRENT_USER\SOFTWARE\Microsoft\Windows\CurrentVersion\Internet Settings\ZoneMap\Ranges |
| Example Listing | O15 - Trusted Zone: http://www.bleepingcomputer.com |
| O15 - Trusted IP range: 206.161.125.149 | |
| O15 - Trusted IP range: 206.161.125.149 (HKLM) |
Which key, Domains or Ranges, is used by Internet Explorer is determined by the URL that the user is trying to reach. If the URL contains a domain name then it will search in the Domains subkeys for a match. If it contains an IP address it will search the Ranges subkeys for a match. When domains are added as a Trusted Site or Restricted they are assigned a value to signify that. If they are assigned a *=4 value, that domain will be entered into the Restricted Sites zone. If they are given a *=2 value, then that domain will be added to the Trusted Sites zone.
Adding an IP address works a bit differently. Under the SOFTWARE\Microsoft\Windows\CurrentVersion\Internet Settings\ZoneMap\Ranges key you may find other keys called Ranges1, Ranges2, Ranges3, Ranges4,... Each of these subkeys correspond to a particular security zone/protocol. If you add an IP address to a security zone, Windows will create a subkey starting with Ranges1 and designate that subkey as the one that will contain all IP addresses of a particular security zone for a particular protocol. For example, if you added http://192.168.1.1 as a trusted sites, Windows would create the first available Ranges key (Ranges1) and add a value of http=2. Any future trusted http:// IP addresses will be added to the Range1 key. Now if you added an IP address to the Restricted sites using the http protocol (ie. http://192.16.1.10), Windows would create another key in sequential order, called Range2. This would have a value of http=4 and any future IP addresses added to the restricted sites will be placed in that key. This continues on for each protocol and security zone setting combination.
If you ever see any domains or IP addresses listed here you should generally remove it unless it is a recognizable URL such as one your company uses. The most common listing you will find here are free.aol.com which you can have fixed if you want. I personally remove all entries from the Trusted Zone as they are ultimately unnecessary to be there.
ProtocolDefaults
When you use IE to connect to a site, the security permissions that are granted to that site are determined by the Zone it is in. There are 5 zones with each being associated with a specific identifying number. These zones with their associated numbers are:
| Zone | Zone Mapping |
| My Computer |
0
|
| Intranet |
1
|
| Trusted |
2
|
| Internet |
3
|
| Restricted |
4
|
Each of the protocols that you use to connect to a site, such as HTTP, FTP, HTTPS, are then mapped to a one of these zones. The following are the default mappings:
| Protocol | Zone Mapping |
| HTTP |
3
|
| HTTPS |
3
|
| FTP |
3
|
| @ivt |
1
|
| shell |
0
|
For example, if you connect to a site using the http:// it will be part of the Internet zone by default. This is because the default zone for http is 3 which corresponds to the Internet zone. The problem arises if a malware changes the default zone type of a particular protocol. For example, if a malware has changed the default zone for the HTTP protocol to 2, then any site you connect to using http will now be considered part of the Trusted zone. As of now there are no known malware that causes this, but we may see differently now that HJT is enumerating this key.
| Registry Keys: | HKEY_LOCAL_MACHINE\SOFTWARE\Microsoft\Windows\CurrentVersion\Internet Settings\ZoneMap\ProtocolDefaults |
| HKEY_CURRENT_USER\SOFTWARE\Microsoft\Windows\CurrentVersion\Internet Settings\ZoneMap\ProtocolDefaults |
| Example Listing | O15 - ProtocolDefaults: 'http' protocol is in Trusted Zone, should be Internet Zone (HKLM) |
O16 Section
This section corresponds to ActiveX Objects, otherwise known as Downloaded Program Files, for Internet Explorer.
ActiveX objects are programs that are downloaded from web sites and are stored on your computer. When Internet Explorer is started, these programs will be loaded as well to provide extra functionality. These objects are stored in C:\windows\Downloaded Program Files. They are also referenced in the registry by their CLSID which is the long string of numbers between the curly braces. To find a listing of all of the installed ActiveX component's CLSIDs, you can look under the HEY_LOCAL_MACHINE\SOFTWARE\Microsoft\Code Store Database\Distribution Units\ Windows Registry key.
There are many legitimate ActiveX controls such as the one in the example which is an iPix viewer.
| Example Listing | O16 - DPF: {11260943-421B-11D0-8EAC-0000C07D88CF} (iPix ActiveX Control) - http://www.ipix.com/download/ipixx.cab |
There is a program called SpywareBlaster that has a large database of malicious ActiveX objects. You can download that and search through it's database for known ActiveX objects.
When you fix O16 entries, HijackThis will attempt to delete them from your hard drive. Normally this will not be a problem, but there are times that HijackThis will not be able to delete the offending file. If this occurs, reboot into safe mode and delete it then.
O17 Section
This section corresponds to Lop.com Domain Hacks.
When you go to a web site using an hostname, like www.bleepingcomputer.com, instead of an IP address, your computer uses a DNS server to resolve the hostname into an IP address like 192.168.1.0. Domain hacks are when the Hijacker changes the DNS servers on your machine to point to their own server, where they can direct you to any site they want. By adding google.com to their DNS server, they can make it so that when you go to www.google.com, they redirect you to a site of their choice.
| Example Listing | 017 - HKLM\System\CS1\Services\VxD\MSTCP: NameServer = 69.57.146.14,69.57.147.175 |
O18 Section
This section corresponds to extra protocols and protocol hijackers.
This method is used by changing the standard protocol drivers that your computer users to ones that the Hijacker provides. This allows the Hijacker to take control of certain ways your computer sends and receives information.
| Registry Keys: | HKEY_LOCAL_MACHINE\SOFTWARE\Classes\PROTOCOLS\ |
| HKEY_LOCAL_MACHINE\SOFTWARE\Classes\CLSID | |
| HKEY_LOCAL_MACHINE\SOFTWARE\Classes\PROTOCOLS\Handler | |
| HKEY_LOCAL_MACHINE\SOFTWARE\Classes\PROTOCOLS\Filter |
| Example Listing | O18 - Protocol: relatedlinks - {5AB65DD4-01FB-44D5-9537-3767AB80F790} - C:\PROGRA~1\COMMON~1\MSIETS\msielink.dll |
Use google to see if the files are legitimate. You can also use SystemLookup.com to help verify files.
It is important to note that fixing these entries does not seem to delete either the Registry entry or the file associated with it. You should have the user reboot into safe mode and manually delete the offending file.
O19 Section
This section corresponds to User style sheet hijacking.
A style sheet is a template for how page layouts, colors, and fonts are viewed from an html page. This type of hijacking overwrites the default style sheet which was developed for handicapped users, and causes large amounts of popups and potential slowdowns.
Registry Key: HKEY_CURRENT_USER\Software\Microsoft\Internet Explorer\Styles\: User Stylesheets
| Example Listing | O19 - User style sheet: c:\WINDOWS\Java\my.css |
When you fix these types of entries, HijackThis will not delete the offending file listed. It is recommended that you reboot into safe mode and delete the style sheet.
O20 Section
AppInit_DLLs
This section corresponds to files being loaded through the AppInit_DLLs Registry value and the Winlogon Notify Subkeys
The AppInit_DLLs registry value contains a list of dlls that will be loaded when user32.dll is loaded. As most Windows executables use the user32.dll, that means that any DLL that is listed in the AppInit_DLLs registry key will be loaded also. This makes it very difficult to remove the DLL as it will be loaded within multiple processes, some of which can not be stopped without causing system instability. The user32.dll file is also used by processes that are automatically started by the system when you log on. This means that the files loaded in the AppInit_DLLs value will be loaded very early in the Windows startup routine allowing the DLL to hide itself or protect itself before we have access to the system.
This method is known to be used by a CoolWebSearch variant and can only be seen in Regedit by right-clicking on the value, and selecting Modify binary data. Registrar Lite, on the other hand, has an easier time seeing this DLL.
Registry Key: HKEY_LOCAL_MACHINE\SOFTWARE\Microsoft\Windows NT\CurrentVersion\Windows\\AppInit_DLLs
| Example Listing | O20 - AppInit_DLLs: C:\WINDOWS\System32\winifhi.dll |
When you fix these types of entries, HijackThis will not delete the offending file listed. It is recommended that you reboot into safe mode and delete the offending file. Use SystemLookup.com to help verify files.
Winlogon Notify
The Winlogon Notify key is generally used by Look2Me infections. HijackThis will list all Winlogon Notify keys that are non-standard so that you can easily spot one that does not belong. You can recognize the Look2Me infection key as it will have a DLL with a random filename located in the %SYSTEM% directory. The name of the Notify key will have a normal looking name even though it does not belong there.
Registry Key: HKEY_LOCAL_MACHINE\SOFTWARE\Microsoft\Windows NT\CurrentVersion\Winlogon\Notify
| Example Listing | O20 - Winlogon Notify: Extensions - C:\WINDOWS\system32\i042laho1d4c.dll |
.
O21 Section
This section corresponds to files being loaded through the ShellServiceObjectDelayLoad registry key.
This Registry contains values in a similar way as the Run key does. The difference is that instead of pointing to the file itself, it points to the CLSID's InProcServer, which contains the information about the particular DLL file that is being used.
The files under this key are loaded automatically by Explorer.exe when your computer starts. Because Explorer.exe is the shell for your computer, it will always start, thus always loading the files under this key. These files are therefore loaded early in the startup process before any human intervention occurs.
A hijacker that uses the method can be recognized by the following entries:
| Example Listing | R0 - HKCU\Software\Microsoft\Internet Explorer\Main,Start Page = C:\WINDOWS\secure.html R1 - HKCU\Software\Microsoft\Internet Explorer\Main,Default_Page_URL = C:\WINDOWS\secure.html |
| Example Listing | O21 - SSODL: System - {3CE8EED5-112D-4E37-B671-74326D12971E} - C:\WINDOWS\system32\system32.dll |
When you fix these types of entries, HijackThis will not delete the offending file listed. It is recommended that you reboot into safe mode and delete the offending file.
O22 Section
This section corresponds to files being loaded through the SharedTaskScheduler registry value.
The entries in this registry run automatically when you start windows. This key is commonly used by SmitFraud variants to display fake security alerts and to download rogue anti-spyware programs.
Registry Key: HKEY_LOCAL_MACHINE\SOFTWARE\Microsoft\Windows\CurrentVersion\Explorer\SharedTaskScheduler
| Example Listing | O22 - SharedTaskScheduler: (no name) - {3F143C3A-1457-6CCA-03A7-7AA23B61E40F} - c:\windows\system32\mtwirl32.dll |
Hijackthis will delete the SharedTaskScheduler value associated with this entry, but will not delete the CLSID that it points to and the file that the CSLID's Inprocserver32 points to. Therefore you should always have the user reboot into safe mode and manually delete this file.
O23 Section
This section corresponds to XP,NT, 2003, and 2003 services.
Services are programs that are loaded automatically by Windows on startup. These services are loaded regardless of whether or not a user logs on to the the computer and tend to be used to handle system wide tasks such as Windows operating system features, antivirus software, or application servers. Lately there has been an increased trend for malware to use services to infect a computer. It is therefore important to examine each of the services listed for ones that do not look correct. Common malware services you may find are Home Search Assistant and the new Bargain Buddy variant. Examples of lines associated with those infections can be found below.
The majority of the Microsoft services have been added to the white list so they will not be listed. If you would like to see these services you can start HijackThis with the /ihatewhitelists flag.
Legitimate Service Example:
| Example Listing | O23 - Service: AVG7 Alert Manager Server (Avg7Alrt) - GRISOFT, s.r.o. - C:\PROGRA~1\Grisoft\AVGFRE~1\avgamsvr.exe |
Home Search Assistant Example:
| Example Listing | O23 - Service: Workstation NetLogon Service - Unknown - C:\WINDOWS\system32\crxu.exe |
Bargain Buddy Examples:
| Example Listing | O23 - Service: ZESOFT - Unknown - C:\WINDOWS\zeta.exe |
| O23 - Service: ISEXEng - Unknown - C:\WINDOWS\System32\angelex.exe |
When you fix a O23 entry Hijackthis will change the startup for this service to disabled, stop the service, and then ask the user to reboot. It will not delete the actual service from the registry or the file it points to. In order to delete the service you will need to know the service name. This name is the text between the parenthesis. If the display name is the same as the service name, then it will not list the service name.
There are three methods you can use to delete the service key:
-
Delete it using XP's SC command you would type the following from a command prompt:
sc delete servicename
To delete the service using a registry file you can use the following example:
-
Use a registry file to delete a service. The below registry file is an
example of how to remove Angelex.exe Bargain buddy variant:
REGEDIT4
[-HKEY_LOCAL_MACHINE\SYSTEM\CurrentControlSet\Enum\Root\LEGACY_ISEXENG]
[-HKEY_LOCAL_MACHINE\SYSTEM\CurrentControlSet\Services\ISEXEng]
[-HKEY_LOCAL_MACHINE\SYSTEM\ControlSet001\Enum\Root\LEGACY_ISEXENG]
[-HKEY_LOCAL_MACHINE\SYSTEM\ControlSet001\Services\ISEXEng]
[-HKEY_LOCAL_MACHINE\SYSTEM\ControlSet003\Enum\Root\LEGACY_ISEXENG]
[-HKEY_LOCAL_MACHINE\SYSTEM\ControlSet003\Services\ISEXEng] - Use HijackThis to delete the service. You can click on Config, then Misc Tools, and then press the Delete an NT service.. button. When it opens you should then enter the service name and press OK.
Be careful when removing items listed in these keys as for the most part they are legitimate. To research O23 entries you can use SystemLookup.com.
O24 Section
This section corresponds to Windows Active Desktop Components.
Active Desktop Components are local or remote html files that are embedded directly onto your desktop as a background. Infections use this method to embed messages, pictures, or web pages directly on to a users desktop. Common examples of infections that use this method are the SmitFraud family of rogue anti-spyware programs. These infections use Active Desktop Components to display fake security warnings as the background of a user's desktop. Other infections that use this method can be found at the following links:
AVGoldThe registry key associated with Active Desktop Components is:
Raze AntiSpyware
AlfaCleaner
TopAntiSpyware
Registry Key: HKEY_CURRENT_USER\Software\Microsoft\Internet Explorer\Desktop\Components
Each specific component is then listed as a numeric subkey of the above Key starting with the number 0. For example:
HKEY_CURRENT_USER\Software\Microsoft\Internet Explorer\Desktop\Components\0\Example listings of Desktop Component entries used by SmitFraud variants are:
HKEY_CURRENT_USER\Software\Microsoft\Internet Explorer\Desktop\Components\1\
HKEY_CURRENT_USER\Software\Microsoft\Internet Explorer\Desktop\Components\2\
| Example Listing | O24 - Desktop Component 0: (Security) - %windir%\index.html O24 - Desktop Component 1: (no name) - %Windir%\warnhp.html |
When fixing these entries, HijackThis will only remove the Desktop Component in the registry. The actual HTML file being referenced, though, will not be deleted. Therefore, if the component is malware related you should manually delete this file.
Conclusion
HijackThis is a very powerful tool for finding out the specifics of your browser and what is running in Windows. Unfortunately, diagnosing the scan results of HijackThis can be complicated. Hopefully my recommendations and explanations will ease the way somewhat. This program, though, is to be used with caution, as incorrectly removing some items can cause problems with legitimate programs. If you have any questions please feel free to ask me on my FaceBook or Email me: c.m.c.firerat@gmail.com
By FireRat


0 comments:
Post a Comment